As a sample application for one
of my friend we had created iCard Creation Project. Just to give details on
this project it’s a simple user interface where in a user will generate iCard
with series of simple steps :
(This is not a final implementation)
Step 1. Log in iCard WebApp register Organization.
Step 2. Create Blueprint or a template for iCard.
Step 3. Enter persons details which will be required to
generate the iCard
Step 4. Upload Photo.
Step 5. Preview iCard & Verify.
Step 6. Generate iCard image.
Step 7. Submit for printing after reviewing the iCard.
First thing is our HIGH
LEVEL DB Design:
(NOT final DB Design)

(NOT final DB Design)

Technology Stack :
- ASP.NET MVC
- MySQL - Backend
- FabricJS - Third party tool for canvas
We had identified two Main types of users who will be using our application, Administrator & General user. These will be our role types, for user Authentication and Authorization we had used ASP.NET’s Forms authentication. Forms authentication is a common feature in many C# MVC .NET web applications. I have used custom MembershipProvider class, along with a custom Principal object. The Principal will hold our custom user details, encrypted within the forms authentication ticket cookie, and allow us to access this data anywhere within the web application.
Setting up the Web.Config for
Forms Authentication:
The first step for implementing
MVC4 .NET forms authentication is to configure the web.config with the
associated tags. We’ll need a configuration for the authentication type and
another for the membership provider, as shown below.


In the above configuration, we’re
setting the forms authentication tag and providing the membership provider
details. We’ve included the name of our custom MyMembershipProvider, as well as
the type property, which combines the assembly and class name. The membership
provider class is an important part of forms authentication, as it allows us to
easily authenticate a user that is logging in. It also assists us in
configuring the HttpContext.User.Identity property.
Login Types: A Class need to be
defined to store UserDetails and share across the web application.


The User class will hold details
read from the database. We’ll store a copy of the User class within the forms
authentication ticket, so it’s important to omit sensitive information from
this class.
Authenticating the Current Request :
Authenticating the Current Request :
To begin, we need to implement the Application_AuthenticateRequest() in the Global.asax.cs file. This method is called on each request in the web application. Our AuthenticateRequest call appears as follows:

In the above code, we first check if a forms authentication ticket cookie exists for the currently connected user. If the cookie exists, we read it and attempt to decrypt it. With the decrypted cookie, we create the custom Principal object and provide it with the decrypted user details from the cookie. This will allow us to access the user details from the standard HttpContext.Current.User property in the .NET MVC web application.
Accessing the User Data in the Ticket :
Since our AuthenticateRequest method has created the User.Identity and included our custom User data within it, we simply need to cast the Context.User object to our custom User type. We’ll then be able to easily access the user details from anywhere within our MVC .NET web application. We can create a helper method for making this more convenient, as shown below:

Web Forms -
Application Setup :
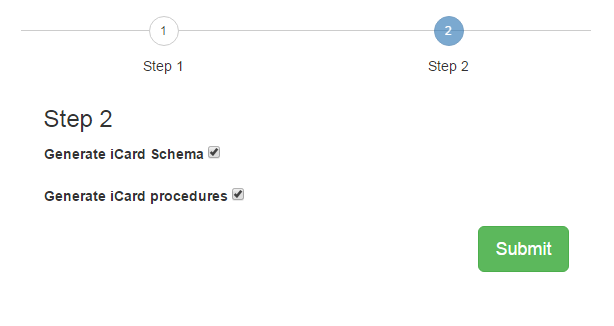
Setup screens were provided to configure database name and credentials in 2 simple steps
Step 1: Is just an input screen as shown in below screenshot.

Step 2: Is an input which tells user whether to generate only table structure or generate required stored procedures to run application.
Login Page :
Login page accepts user name and pass and redirects to home page.
 |
| Login Screen |
Home Page :
After validating users from login page, home page is the main landing page of iCard creation app. Menus displayed at the left hand side are displayed according to Role Types, like screenshot displayed below is the menu for Administrator role.
Adding Organization Details :
Create Read Update Delete operations for general operational details i.e. Company → Department → Division → Employee Information. Additional functionality like Pagging, Sorting & Searching is also implemented in these forms.
Canvas Field Selector :
Field selector is only displayed for Administrator where in he can select required fields which will be later available to display on canvas. These checked fields will act as place holders for actual data generated from saved employee information.
Canvas To Create iCard Template :
This is where user can create generic template which can be used to generate iCard. I have used third party javascript framework to create canvas, that is fabric.js - a powerful Javascript library that makes working with HTML5 canvas a breeze. Fabric provides a missing object model for canvas, as well as an SVG parser, layer of interactivity, and a whole suite of other indispensable tools.
Review & Generate iCard :
Using general filters we can generate iCard, as shown in below screenshot. This will allow to review the generated card if he finds any issue in user data or canvas template he can go back and update required changes and can again generate new iCard for the same user.
There was a thought that there should be a review process where in user who is reviewing can get an approval after approval he can go ahead in generating the iCard.
Final Generated iCard :
 |
| Home Screen |
Adding Organization Details :
Create Read Update Delete operations for general operational details i.e. Company → Department → Division → Employee Information. Additional functionality like Pagging, Sorting & Searching is also implemented in these forms.
 |
| Company Screen |
 |
| Department Screen |
 |
| Employee Information Screen |
(NOTE: Not adding all CRUD pages as it will generate unnecessary screenshots.)
Canvas Field Selector :
Field selector is only displayed for Administrator where in he can select required fields which will be later available to display on canvas. These checked fields will act as place holders for actual data generated from saved employee information.
 |
| Canvas Field Selector |
This is where user can create generic template which can be used to generate iCard. I have used third party javascript framework to create canvas, that is fabric.js - a powerful Javascript library that makes working with HTML5 canvas a breeze. Fabric provides a missing object model for canvas, as well as an SVG parser, layer of interactivity, and a whole suite of other indispensable tools.
 |
| iCard Template Creator |
Using general filters we can generate iCard, as shown in below screenshot. This will allow to review the generated card if he finds any issue in user data or canvas template he can go back and update required changes and can again generate new iCard for the same user.
There was a thought that there should be a review process where in user who is reviewing can get an approval after approval he can go ahead in generating the iCard.
 |
| Review & Preview Screen |
This is the final output of our web application where in the user iCard is ready to be printed.
 |
| Final iCard |


User management pages are used to define application and user management flow like Modifying current user details, number of records to be displayed in all the grids in application, and changing of current password.
If you require code of this project mail me :)


